
Now that you have decided to learn how to fly fish, you will need to think about the types of waterways you want to fish and the fish species you want to catch. The answers to these two questions will determine the kind of fly fishing gear you need and the different types of flies to choose.
Getting Started
Knowing where fish rest, hide or feed is the first step in locating the best places to fly fish.
Most people have a fly fishing water source close to home. Here are four basic steps to finding fish in fly fishing:
①Location: Find the fish and you are halfway to catching them.
②Observation: Know the foods fish eat.
③Imitation: Have your fly look like the foods fish eat.
④Presentation: Get your fly to the fish in a natural and lifelike way.
WHERE TO FIND PANFISH
These relatively small fish usually live in warm-water lakes and ponds. You will also find them in warm-water rivers along weedy shorelines and in shallow bays. In ponds and lakes, panfish (such as crappie, sunfish and bluegill) like shallow weedy areas because that's where most of the foods they eat live. In spring, they spawn along shorelines, in nests that look like light-colored, oval depressions. Panfish also love structures, such as boat docks, duck blinds, depressions in the pond bottom or shallow reefs. Learn to spot these structures, and you can locate the places where you should cast your fly for panfish.
WHERE TO FIND TROUT
Trout are coldwater fish, so you will only find them in rivers, lakes and ponds that have cold water year round. In rivers, trout face upstream bringing the food to them. Like bass and panfish, they spend all their time eating, resting and hiding from predators.
When they are resting, river trout hide under currents; near the bottom of deep pools; under shoreline structures such as logs, brushy banks, undercut banks, and boulders; and in holes and culverts.
When they are feeding, stream trout move to where the food comes to them - eddies (anywhere there is a break in the flow, creating a fast current beside slow-moving water), along weedbeds, behind boulders, at the tailouts (exits) of pools (places in the stream where water moves slowly), and in early morning or late evening in the stream shallows. Discover feeding trout (and bass and panfish) by looking for the riseforms (dimples they make when feeding on the surface). You can locate nymphing trout (fish-eating nymphs beneath the surface) by looking down into the water (using polarized sunglasses) and spotting their sides or open mouths flashing as they feed.
Lake- and pond-dwelling trout behave differently, cruising in search of their food. Look for them along weedbeds, a prime location for insect life. Also look for riseforms on the lake. And, trout often cruise the surface and "gulp" hatching aquatic insects.
WHERE TO FIND BASS AND PICKEREL
These fish capture their foods by ambush. Since they prey on panfish, they often lie in or nearby the same places that you find and fish for panfish. In addition to panfish, bass and pickerel snatch moving minnows, frogs and crayfish. In lakes and ponds, expect to find them prowling or lurking around lilypads, weedbeds, boat docks, logs, and overhanging trees or tree trunks - or just lying in the water near any manmade structure where they can hide. Also look for them around headlands, jetties, reefs or along the shoreline.
In rivers where water moves and brings food to fish, expect to find bass hiding wherever you find a break in the flow of the water - around rocks, ledges, jetties, under docks, in the riffle edges of large pools and along shoreline weedbeds. Remember that larger bass usually live in or near the deeper holes. The larger the fish, the more depth it needs for protection and food.
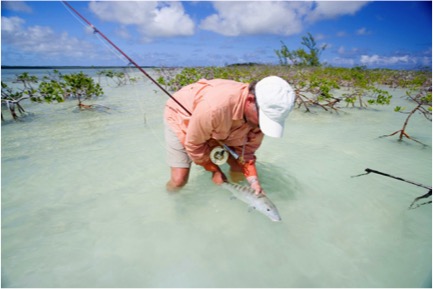
WHERE TO FIND SALTWATER FISH
Inshore saltwater fish move with the tides to find their foods - usually small baitfish. These baitfish also move with the tides, so the more you know about when the tides change and how the changes affect the fish, the more likely you'll be to catch a fish.
Here's an example. When the tides take the water out of saltwater ponds, the moving water washes tiny baitfish called sandeels out toward the deeper water, and predator saltwater fish slash at the baitfish. When the tides are right, bluefish chase baitfish, up against the beaches, where they trap and eat them. On the saltwater flats of Texas and Florida, a rising tide brings the bonefish and redfish in to feed on the creatures that dwell there. Tarpon follow the tides inshore to do their feeding and resting.
So look for saltwater fish around structures such as inlets, tidal rip areas, beaches, headlands, under docks, around lights (at night), on tidal flats and in channels that pass tidal flows.
Also watch for diving gulls and other birds. Chances are predator fish have slashed into schools of baitfish and left crippled fish that are easy pickings for the gulls. And watch for surface disturbances along shorelines, where hunting fish are pursuing baitfish.
On the saltwater flats, look for "busting" tarpon, where the backs and heads of the fish appear on the surface. Also look for things like bonefish eating head-down with their tails sticking up through the surface, and the surface ripples where redfish feed.
Wherever you fish on salt water, surface disturbances indicate fish. Being alert to those disturbances is key to your success!
WHERE CAN I FLY FISH?

You can fly fish just about anywhere fish live - in streams, lakes - even in the ocean. Finding the right spot will depend on what type of fish you would like to catch. There's probably a fly fishing spot fairly close to where you live. For more information, check out our where to fly fish page.
DO I NEED A SPECIAL ROD FOR FLY FISHING?
Yes. Fly fishing rods are different from the rods used in other types of fishing. And, just like other types of fishing rods, fly fishing rods can vary greatly. To find the right rod, you will need to know where you plan to fish, the types of fish you would like to catch, plus a few other details. The fly fishing rod page has a lot of information on choosing the right rod.
WHAT KIND OF FLY REEL SHOULD I GET TO GO WITH MY FLY ROD?
The fly reel is a very important piece of fly fishing gear, you'll need it to reel in the big one! Finding the right reel and learning how to set it up is covered in the fly reel page on this site.
HOW DO I KNOW WHAT KIND OF LINE TO USE WITH MY FLY FISHING ROD AND REEL?
The right line will depend on the type of fly being used, where you are fly fishing and the type of fish you are trying to catch. There are a number of factors that go into determining the right fly line. Our fly fishing line page will help you make the best choice.
WHAT IS A LEADER?
A fly fishing leader is used to connect the fly line to the fly, ensuring the fly is presented to fish in a way that resembles the movements of the actual insect the fly is imitating. Find more information on the fly leader and how it is used on the fly leader and tippet page.
WHAT IS A TIPPET?
A tippet is a piece of specialized line connected to the leader that helps in the fly presentation to fish, making sure the fly turns over during the cast to simulate the real insect it is imitating. More information on the tippet and how it connects the fly to the leader can be found on our fly leader and tippet page.
DO I NEED WADERS FOR FLY FISHING?
You do not need waders, but if you plan on fishing from the water, they certainly help keep you dry. When using waders, be aware of the type of soles used, a rubber sole is more environmentally friendly than a traditional felt sole. Find out more about when to use waders on the fly fishing wader page.
I HAVE ALL MY EQUIPMENT. HOW DO I PUT EVERYTHING TOGETHER?
For step-by-step instruction on how to connect rod to reel, reel to line, line to leader and fly to tippet, check out the fly fishing tackle assembly page. This page also includes helpful tips on disassembling your equipment and storing it safely.
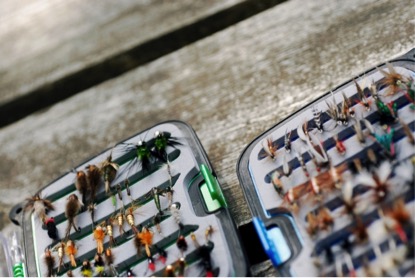
HOW DO I KNOW WHICH FLY TO USE?
Although this always changes, there is one simple rule to help you pick the perfect fly: match the hatch. This means you should use a fly that imitates whatever insects are abundant at your fishing spot. The makeup of hatches changes and is different across the country, so your best bet is to tap into the expertise of the local bait shop. However, helpful information can also be found on the best fishing flies page.
IF I AM JUST STARTING TO FLY FISH, WHAT FLIES SHOULD I GET RIGHT AWAY?
There are three basic groups of fly patterns: dry flies, nymphs and streamers. For more information on each of these types of fishing flies, check out the starter flies page.
WHAT ARE STREAMERS?
Streamers are a type of fishing fly that imitates a small baitfish or leech, usually used to catch larger fish. The fishing with streamers page provides more helpful tips on which streamers to use and how to use them.
HOW DO I LEARN TO FLY CAST?
Although it is very challenging, fly casting can be broken down into five steps, which are detailed on the fly casting basics page. Learning to fly cast will take some practice, but is a very rewarding and fun skill to learn and perfect.
WHAT IS THE ROLL CAST AND WHEN WOULD I USE IT?
The roll cast is a great cast to use when you do not have a lot of room to make your cast. Just follow the four steps outlined on the roll cast page, and you'll be casting from tight spots in no time.
WHAT IS THE TWO-STROKE CAST?
Unlike the roll cast, the two-stroke cast is best used when you have a lot of open space around you. The two-stroke cast page details how the back and forward casts combine to create the handy two-stroke.
I WANT TO GO FLY FISHING, BUT WILL I BE ABLE TO CAST IN THE WIND?
Casting in the wind can be challenging, but if you know how to deal with windy conditions, the fly fishing can be great! Check out the tips for casting when the breeze blows fierce on the casting in the wind page.
HOW DO I CATCH FISH ON THE WATER'S SURFACE?
You would use the most popular method of fly fishing, and that's with a dry fly. In this type of angling, the dry fly (one that doesn't sink) is cast and presented to the fish on the surface. The surface techniques page has some great tips to help you watch a fish strike the fly at the top of the water.
I KNOW I CAN PURCHASE FLIES, BUT HOW CAN I LEARN TO TIE MY OWN FLIES?
Fly tying can take some time to master, but catching a fish on a fly you tied yourself is extremely rewarding. Instructions on tying some of the classic patterns can be found on the tying flies page.
WHAT IS MENDING?
Mending is repositioning the fly line on the water and is used to improve the presentation of the fly to the fish. Take a look at the mending page for advice on how to master this skill.
WHAT IS THE HAUL CAST AND WHEN IS IT USED?
The haul cast is a special way to cast a fly during very windy days. The idea is to use the tension of the water on your fly line to launch your line and fly with more velocity to cut through the wind than can be achieved with other types of fly casting. The haul casting page has details on the steps to haul cast and covers both double and triple haul casts.
Tackle Assembly
Learn step by step how to assemble your fly fishing tackle.
FLY ROD ASSEMBLY
①Put the rod together by connecting the ferrules (the connections between the fly rod sections). Most fly rods are two-piece, so there will be only a single ferrule connection. Multi-piece pack fly rods with as many as six sections have additional ferrules.
②With pack or travel rods, begin assembling the rod at the butt end and progress to the tip.
③Line up the guides and slightly tighten the ferrule. Never push, force or twist the ferrule excessively - damage or locking of the rod sections may occur if you do.
④Look down the fly rod to make sure the guides are all in a straight line. To avoid rod damage, do not lay the rod down or prop it against an irregular surface as you unpack your fly reel. Be especially cautious of doors and car trunks, which break more fly rods than fish do.
FLY REEL ATTACHMENT TO FLY ROD
①Remove the fly reel from its bag or case. Do not drop it. Most fly reels will be damaged if dropped onto a hard surface.
②Position the fly reel correctly, making sure the handle is on the proper side, and tighten the reel seat hardware down snugly on the reel foot.
③Never tighten the fly reel to the seat by using excess finger pressure or pliers.
PULLING LINE THROUGH THE FLY ROD'S GUIDES
①Find the leader's end and pull the entire leader and 10 to 15 feet of fly line from the reel.
②Pull fly line off with one hand while holding the fly rod with the other.
③Never lay the rod down and pull the line out. This will cause reel damage and allow grit to get into the reel. If grit does get into the fly reel, remove the spool and rinse off both the frame and spool with fresh water. This will usually flush away most of the grit.
④Double over the fly line about 2 feet from the leader and pass the doubled end through each guide, pulling the excess fly line and fly leader after it.
STRAIGHTENING THE FLY LEADER AND FLY LINE
Because both the fly leader and fly line are stored in small coils on your reel, they will not be straight enough for good casting and fishing performance. You'll need to straighten them. Follow these simple steps:
①Hold the fly line firmly just above the leader junction knot.
②Grasp the fly leader at the junction with both hands and begin pulling, using sliding strokes, working slowly down to the leader tip. This heats and stretches the coiled leader.
③Feel the fly leader get warm in your grip, then stretch it very tightly for about 30 seconds. This heating, stretching and cooling will straighten the leader. Repeat if necessary. Avoid using so-called leader straighteners. These can easily overheat the fly leader, and weaken and damage it.
④Pull as much fly line as you will be casting out through the fly rod's tip guide. Slowly pull on and stretch short sections of the fly line. This should remove most of the line coils. Repeat this step if necessary. In cold weather (below 40 degrees F) be extremely careful not to quickly pull the fly line very tight, or the plastic finish may crack. You can also attach the fly leader and fly line to a stationary object, then pull the entire length at once.
⑤Now rewind the fly line onto the fly reel. It will remain straightened for a day's use.
TIPPET AND FLY ASSEMBLY
If you are using a floating fly line and intend to clean or dress it with waterproof floatant, this is the most opportune time to do it. While the fly line is stretched, apply the cleaner with a clean cloth or dressing applicator. Fly lines, new and used, always last and perform better if they are regularly cleaned and dressed. Products designed to clean and condition fly lines are available at most fly shops.
TIPPET AND FLY ATTACHMENT
Attach your fly to the fly leader tippet with the Duncan loop , Turle knot or improved cinch . The Duncan loop, or Uniknot, is usually the most practical and versatile. Because the loop formed is adjustable, the fly can be held tight or loose, or with a large shock loop, with a simple loop size adjustment.
FLY RETENTION
To hold or store the fly temporarily before you begin casting it, or between fishing periods, put the fly in the rod's hook-keeper and tighten the fly line so it will not fall out. If the leader goes inside the rod's guides at this point, pull it entirely out, pass the fly leader around the reel seat, hook the fly in the keeper or the closest rod guide, and bring the leader under tension again with the fly reel.
FLY ROD DISASSEMBLY
Improperly disassembling and storing your fly tackle can cause damage or deterioration, or delay before its next use. After a day of fly fishing, it is easy to neglect your tackle and forget it until next time. Avoid problems by following these steps.
FLY REMOVAL
Cut the fly off the leader and carefully store it in an open area (hat band or vest fly-drying patch).
LINE/LEADER ON FLY REEL
Carefully and evenly wind your fly line and fly leader back onto the reel under light tension only. You can wipe the fly line nearly clean and dry with a towel. Do not wind the fly line onto the fly reel too loosely or too tightly. Either will cause line damage or tangles.
FLY ROD STORAGE
①Remove the fly reel from the fly rod. Wipe it clean with a towel. Put it into its storage bag or case, but do not close it tightly. Allow air to reach the fly reel so any moisture remaining in and on it can evaporate.
②Take a careful, firm grip on the two sections of the fly rod and pull the ferrules apart. If the ferrules become stuck, have your partner also take hold of each section as both of you pull the sections apart. Be particularly careful that you do not bend or twist either section as you pull them apart.
③Use a towel or cloth to dry and clean the fly rod. A spray window cleaner will safely remove any dirt or greasy film. After the fly rod has been wiped dry, place it, ferrules down, in the cloth bag. Do not get the bag wet. Now place the fly rod, inside its bag, into the rod case or tube.
④If you must store either a damp fly rod or damp bag, remember to remove them from the case and allow them to dry as soon as you can.
FLY FISHING EQUIPMENT STORAGE
Keep both the fly rod and fly reel in a cool, dry, dark place away from sunlight when possible. Be sure you do not seal either the rod or reel case tightly during long storages. When storing your fly reel and fly line for a few months, it's best to remove the line from the reel, clean it and store it in large, loose coils to extend its life. Fly lines have soft, flexible coatings or finishes that will deform if left tight on a fly reel for long periods.
Well-maintained fly fishing equipment is a joy to use and less likely to fail when the fish of a lifetime is at the end of your line. Routine maintenance and care lets your fly fishing equipment give you the best service for your investment.
Tying Flies
One of the best ways to achieve fly fishing success is by tying yourself a lifelike fly, specific to the type of fish you want to catch. A well-tied fly, manipulated skillfully by you, can fool even the smartest fish.

Here are three of the classic fly patterns. One of them should work for you in the majority of instances:
ADAMS DRY FLY

This American fly pattern is considered by many fly fishermen to be the best dry fly pattern ever conceived. And, it is versatile. One of the greatest things about fly tying is the ability to change patterns around. With the Adams dry fly, the grey muskrat body color is often switched to imitate other species of mayflies and caddis. Don't leave home without the Adams! Watch the following video to learn more.
PHEASANT TAIL NYMPH

The pheasant tail nymph suggests all sorts of real trout food throughout the season and is possibly the best mayfly nymph imitation ever designed. Mayfly nymphs are versatile, living in fast, turbulent water or in slow or still water environments.
For basic instructions on tying this great fly. Watch the following video to learn more.
THE WOOLLY BUGGER

The most recognized fly of them all, the woolly bugger represents a streamer - in other words, not a "fly" per se, but rather a baitfish. It can resemble a leech, or a larva-type creature moving about the streambed. The most common woolly buggers are tied in earth tones; however, hot colors seem to work when nothing else does. The use of flash in the tail is also popular. This is a must-have fly.
One of the reasons the woolly bugger has become so successful is its simplicity. Only basic materials and knowledge of fly tying are required to tie any number of bugger variations. Watch this video for instructions on tying this classic fly.
Visit our next section to learn more about fly line mending.
Fly Line Mending
In fly fishing, line mending is a repositioning of the fly line on the water so that its new position extends the fly's drift. Mends are upstream (upwind) or downstream rod flips, which reposition the line belly while it is adrift.

Mending is essential to many fly presentations; both dry and wet fly methods call for line mending. A simple flip of the wrist mends the line. Upstream flips tend to slow down the fly's drift; downstream flips hasten the fly's drift.
A stream's diverse current speed causes the need for mending and determines the direction of the mend. For example, when the fly is in faster current than its line, a downstream mend extends the fly's drift. On the other hand, when the fly is in a slower current than its line, an upstream mend extends the fly's drift. Since streams seldom have a uniform current, the fly fisherman is constantly confronted with mixed current speeds. Common sense determines the direction the line is mended.
An upstream mend repositions the line belly to float at the same position as the fly; so mending lengthens the fly's drift by preventing drag.
As you fish out a cast, constantly watch the fly and line position. As the fish's relationship to the line changes, correct the line by mending it in the appropriate direction. Optimally, the mending goal is to keep the line, leader and fly in a straight line. Mending retains this straight alignment.
Visit our next section to learn more about fly fishing knots.
Fly Line Knots
Tying fly knots can be tricky. The hooks are usually small. And you want to keep the knots really neat so they're attractive to the fish and easy to cast. Learn how to tie the most common fly fishing knots.

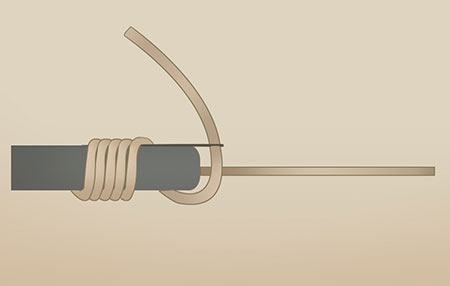
NAIL KNOT

Used to attach your backing line or leader material to your fly line. Line up your fly line, your backing line (or leader line) and a small-diameter nail or needle. Wrap the backline around the fly line and nail five to eight times. Bring the tag end over and push it back between the loops, remove the nail, and tighten the knot.
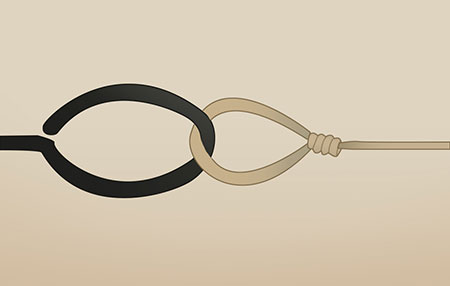
DOUBLE SURGEON'S KNOT
Used to connect monofilament of similar or dissimilar sizes. This knot is superior to the more popular Blood Knot in several ways. Most important, it has a stronger breaking strength and is better for joining widely divergent monofilament sizes. It's also easier to tie than a Blood Knot.
DOUBLE TURLE KNOT

Exclusively for tying flies with up or down-turned eyes to the shank of a hook, this smaller knot allows an excellent presentation by keeping the fly (especially nymphs) in line with your cast.
NEEDLE KNOT
Works great for tying a monofilament leader to your fly line. Use a needle to create a hole through the center of your fly line and out the side. Next pull your leader line through the hole. Then use a nail as a brace so you can wrap the leader line around the fly line.
TUBE/NAIL NEEDLE KNOT

Instead of running a needle through your fly line, line up the leader line, fly line and a small piece of stiff plastic tubing. Next wrap the leader line around the tube and fly line five to eight times. Then run the leader line through the tube and remove the tube.
EMERGENCY NAIL KNOT

This knot is like a tube or nail knot when you don't have a tube or nail. Take a short piece of strong, double monofilament line and fold it in half. Line up your fly line, leader line and the folded piece of monofilament. Wrap the leader line around the fly line and monofilament and pull the tag end of the leader through the looped part of the monofilament. Use the ends of the monofilament to pull the tag line through the wraps.
DUNCAN LOOP
Use the Duncan Loop to attach your fly to your tippet. Leave the loop open to allow the fly to swing freely, or close the loop tight against the hook eye for a tight hold.