
Fishing knots are special knots that help ensure your tackle does not come off your line while fishing rigs are the combination of the hooks, swivels, sinkers and other tackle added to the end of your line. Get started today with these instructions and videos on knot tying and creating rigs.
Line Joining Knots
Knot tying is not just line to hook, it is also tying line to line. And when it's called for, you need a really good knot. Learn how to tie line joining knots with the following instructions.

Line joining knots tend to be popular fly fishing knots as well as critical in situations like when you have a reliable rig on 15-pound test line and you want to attach it to the 20-pound test line on your reel without having to retie the whole rig. The below knots are tested and reliable for joining two pieces of fishing line.
DOUBLE SURGEON’S KNOT (SKILL LEVEL - EASY TO INTERMEDIATE)

Surgeon's knots are popular fly fishing knots. Compared to the surgeon’s knot, It adds an extra twist when tying the first throw, forming a double overhand knot, thus adding friction which makes the knot more secure.
This knot makes it easy to join two lines, but one line must be short, since you have to bring the one end through the formed overhand loop. As with other lines, use a lot of overlapping line so that you can pull on all four ends to make it properly tight. Work with both lines together as you tie this, and make sure both loops are the same size to assure a strong knot. Follow these instructions to learn to tie:
DOUBLE UNI-KNOT (SKILL LEVEL - INTERMEDIATE)

A double uni-knot is two fishing knots tied back to back, then placed together to form a strong connection. Leave plenty of line at the end of the knot on each piece of line you're joining. The ends help pull the two knots into one. These line joining knots are great for attaching leader to your main line and works whether or not the lines are the same (braid to monofilament, or braid to fluorocarbon leader)
Double uni-knot requires you to tie a uni knot with each of the two lines, with the knots facing opposite directions.
1. Lay your main line and your leader or secondary line out in front of you so that they overlap for a good distance, start with at least a foot of overlap until you know how much you need
2. Form a loop in the left-hand portion of the overlap that goes clockwise. You should use the line that terminates to your left for this
3. Pass that line around the other line and through the loop five times (see uni-knot above). Snug the knot up, but don’t pull it tight
4. With the line to your right, form a loop that goes counter clockwise
5. Pass that line around the other line and twist it through the loop five times. If you are using a larger diameter leader you might only need three wraps
6. Snug that knot up, but don’t pull it tight
7. Lubricate the two lines between the two knots with saliva. Grasp both lines and pull them away from each other. The knots should slide together and pull tight
8. Trim each tag closely. The finished knot should resemble a barrel
ALBRIGHT LINE JOINING KNOTS (SKILL LEVEL - INTERMEDIATE)
Albright knots are popular for tying together two lines of unequal diameter and are popular fly fishing knots. A situation when you may use this knot tying technique is when you have to tie the 15-pound test line on your rig to the 20-pound test you currently have on your reel spool or when tying monofilament backing to a fly line.
1. Fold the leader back to form a loop, and pass the main line through the loop
2. Wrap the main line around itself and the loop 10 times
3. Pass the tag of the main line back through the loop
4. Start to close the knot with light pressure on both the tag and standing portions of the main line AND the tag of the leader
5. As the line tightens drop the tag of the leader and the tag of the main line and pull it completely tight with pressure of the line against the leader
6. Trim closely
BLOOD KNOT (SKILL LEVEL - ADVANCED)

A blood knot (or barrel knot) is two back to back clinch knots and is most used for joining sections of monofilament nylon line of similar weight while maintaining a high portion of the line's inherent strength. Other line joining knots used for this purpose can cause a substantial loss of strength. The principal drawback to the blood knot is the dexterity required to tie it. In fly fishing, this serves to build a leader of gradually decreasing diameter with an easily cast fly line attached at the large diameter end and the fly or hook at the small diameter end.
1. Overlap the two lines
2. Wrap your first line around the other line about 5 times, then take the tag end back towards the center and tuck it between the lines
3. Repeat this process on the other side, wrapping the second line around the first and bring the tag end back to the center and tucking it between the lines. A this point both tag ends should be in the center, facing opposite directions
4. The lines are moistened and the wraps tightened by pulling on the long ends of the line
Once you have conquered knot tying, try your hand at traditional casting or fly casting.
Lure and Rig Fishing Knots
Learn how to choose the best fishing knot to tie hooks, lures and rigs. Because there are so many types of fishing knots, there may be more than one best fishing knot for each situation.

The below fishing knots are tested and proven to offer at least 90 percent of the original line strength when tying tackle (lures, swivels, sinkers, bobbers, etc.) to a line. You don't have to learn all of them. But sometimes learning a complicated knot can be challenging and rewarding. First, learn how to tie a fishing hook with some of the basic knots that allow you to simply enjoy your hobby.
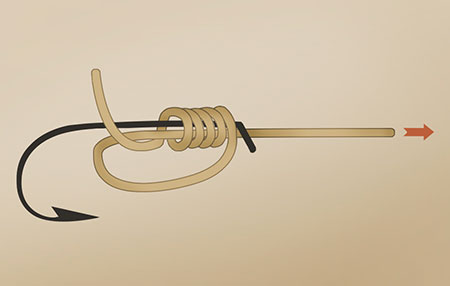
IMPROVED CLINCH KNOT (SKILL LEVEL - EASY)

If you are looking for the best fishing knots for securing your line to a lure, swivel, clip, or artificial fly, consider learning the popular Improved Clinch Knot. It offers up to 95 % of the original line strength. The key is to make five turns of the tag end around the standing end before running the tag end back through the formed loop.
1. Thread the line through the eye of the hook or lure leaving about 6-12 inches of line.
2. Leaving a small space between the line and the hook eye, twist the tag end around the standing line five times.
3. Pass the tag end back through the small space you made near the hook eye.
4. Then run the tag end back through the second loop you created in step 3.
5. Pull both the standing line and the tag end slowly away from hook.
6. Moisten your lines with saliva or water
7. Pull only the standing line firmly away from the hook
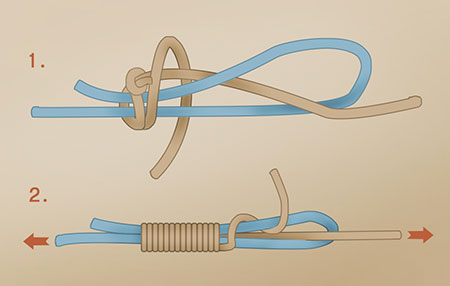
UNI KNOT (OR DUNCAN KNOT) (SKILL LEVEL - EASY)

Some consider the uni knot to be the best fishing knot for tying an eyed hook to a leader. Don't be afraid to cut the end short with this knot. It'll hold. These fishing knots are great to learn because they work well with braided or monofilament fishing line, and can be used to tie lines of unequal diameter together.
1. Pass the line through the eye of the hook and double back parallel to the standing line
2. Make a loop by laying the tag end over the doubled line, while both lines face the same direction
3. Next, make five or six turns with the tag end around the doubled line and through the loop
4. Holding your swivel or hook in one hand and both ends of the line in the other hand, pull them apart gently so the knot is almost tied, but not yet tight
5. Moisten the lines with some saliva and pull only the standing line firmly away from your hook or swivel
6. Lastly, trim the tag end to complete your knot
PALOMAR KNOT (SKILL LEVEL - INTERMEDIATE)

Some anglers think Palomar knots are the best fishing knots for light fishing lines (especially braided line which will not pull out of this knot) as they retain much of the original line strength. Learn how to tie a fishing hook with this knot and see what you think.
Over 95 percent in strength, the palomar knot is good for lines up to 20 pound test. Because it's double-run through the lure or hook eye, knotted, and then looped over the hook or lure, it may tangle easier. But it's still a favorite knot of many anglers.
1. Fold about 6 inches of line over on itself
2. Take the folded line and pass it through the eye of the hook or lure
3. Make an overhand knot just above the eye of the hook, leaving a couple inches on the tag end of the folded line
4. Open your folded line, which is now a loop and pass the loop over the hook or lure
5. Pull both the tag and standing line to close the loop
NON-SLIP LOOP FISHING KNOTS (SKILL LEVEL - INTERME

Non-slip loop knots create a fixed loop so a hook can move freely. It is best with larger lines where a tight knot, such as the Improved Clinch can impede hook, bait or lure movement.
1. Tie an overhand knot about 10 inches from the end of the line. Pass the tag end through the lure eye and then back through the overhand loop
2. Above the overhand, wrap the tag end around the standing line five times
3. Then pass it back through the overhand knot once more
4. Moisten the lines with saliva then pull tight
SNELLING AN EYED HOOK (SKILL LEVEL - INTERMEDIATE)
Snelling means tying the knot away from the eye of the hook. These fishing knots work well for any type of fishing to increase strength and improve catch rates with bigger fish.
1. Start with an up-turned or down turned eye hook. Pass the line through the hook and form a large loop along the shank of the hook. The tag end should lay along the shank of the hook
2. Turn the entire loop around the shank of the hook and the tag end, forming wraps down the shank towards the curve of the hook. Depending on the size of the hook and the size of the line, you might need 6-10 wraps
3. Pull on the main line to tighten the snell
SPADE-END KNOT (SKILL LEVEL - INTERMEDIATE TO ADVA

A spade hook has no eye. So you have to tie a knot next to the flat, bent end of the hook shank. Spade hooks are small. So don't worry, it will hold.
The spade end version relies on the same method as above, but you don’t have to pass the main line through the loop because there is no loop.
Now that you’ve learned how to tie a fishing hook with various fishing knots, you’re ready to build a fishing rig at the end of your line.
Loop Knots for Fishing
Loop knots are meant to have open loops where you can tie a line to the end of a rig or to make an interconnecting system for attaching tackle parts. Learn how to create loop knots with these simple instructions.

Loop knots are used so the line or leader won’t impair the action of the lure, for example with “walk-the-dog” artificial lures that “swim” back and forth.
SURGEON’S LOOP (SKILL LEVEL - EASY)

These loop knots will use more line than most. It can feel bulky, but is great for making quick, strong loops at the end of lines and leaders for connecting to other loops.
1. Fold over the tag end of line
2. Using both strands, create a double overhand knot
3. Pull up carefully on both ends as well as the middle loop
FIGURE-EIGHT LOOP (SKILL LEVEL - EASY)

Figure-eight loop knots are easy to tie and are often used on multi-hook fishing lines. Use this knot to make a loop in the middle of your line to attach a hook or another rig.
1. Fold over the tag end of line forming a double line (leaving lots of extra line)
2. Then create a figure-eight bend with the two lines, ending by going through the first loop
3. As with the Surgeon's Loop, pull tight on the loop and both tag ends
IN-LINE DROPPER (SKILL LEVEL - INTERMEDIATE)

Use this knot to make a loop in the middle of your line to attach a hook or another rig. These loop knots are often used on multi-hook fishing lines.
1. Fold the line back over itself to make a loop
2. Then twist the two overlapping line sections four or five times
3. Pull the loop through this center twist
4. Pull tight
Now that you’ve learned how to tie fishing knots such as loop knots and line joining knots, you’re ready to build a fishing rig at the end of your line.
Bass Fishing Rigs
Some of these bass fishing rigs are adaptations of other rigs, and some are ways of fishing soft plastics such as artificial worms and tubes. Each of the below bass rigs has a different use.
CAROLINA RIGS

Carolina Rigs are Sliding Sinker Rigs created specifically as bass fishing rigs with a weedless hook and a soft plastic worm. A Carolina rig works with egg sinkers up to 3 or 4 ounces. Lighter sinkers help the rig pass through weeds or grass.
Bass fishing tips: For a heavier weight, replace the egg sinker with a fishfinder slide (a hollow tube with an attachment point for heavier sinkers) and clip on a heavier weight. To keep the sinker or fishfinder from snagging on the swivel, place a small plastic bead on the mainline between the sinker and the swivel. The advantage of a Carolina rig or fishfinder rig is that it allows the fish to pick up the bait without detecting the weight of the sinker.
How to thread a plastic worm on to the hooks of bass fishing rigs:
1. To rig a soft plastic worm to work as a weedless lure, you’ll want to start with an offset shank worm hook (although other hooks will work as well).
2. To start, push the point of the hook into the center of the top of the worm so the tip penetrates just a quarter inch or so into the worm, and then push the tip through the side of the worm. Slide the hook through the head of the worm to the offset, twisting the point of the hook 180 degrees so it points back towards the worm.
3. Hold the worm by the head and allow it to hang straight down against the hook. Grab the worm between two fingers where the point of the hook rests against the body of the worm. Lift the worm just slightly and angle it so you can push the point of the hook completely through the body of the worm.
4. Pinch the worm at the point of the hook and slip the point just below the skin of the worm to make it weedless.
5. You might have to finesse the worm at the top of the hook to make the whole thing lie flat. If the worm is humped up, or curved, try again. The body of the worm should lie more or less in a straight line for it to be effective.
TEXAS RIG

The Texas Rig is one of the popular bass fishing rigs. It is a way to fish a soft plastic worm close to or in cover such as weeds. It requires a special cone-shaped weight and a “worm hook” which is designed to be threaded through the worm so that the point of the hook is not exposed. This allows these rigs to worked through weeds or heavy cover.
1. Slide a cone-shaped weight through your main line with the bottom of the cone facing the end of the line
2. Tie on a weedless worm hook
3. Add a soft plastic worm by first threading
Bass fishing tips: Some anglers like to jam the weight in place with a small bit of toothpick.
DROP SHOT RIG

Drop shot rigs are also popular bass fishing rigs as they allow you to present a soft plastic lure above the bottom to bass that are suspended just above the bottom. But they also are great fishing rigs for catfish and a variety of other species. It consists of a weight and a hook tied inline such that it hangs with the shank parallel to the bottom. ThePalomar knot is a great way to tie this rig. The hook should face upwards which will help keep it from snagging.
1. Double your line and pass it through the eye of the hook. Make sure to leave enough of a tag end to tie your weight on later. Tie an overhand knot but do not pull it tight, allowing the hook to dangle freely
2. Pull the loop from your overhead knot over the hook and tighten by pulling both parts of the line. (you have essentially tied a palomar knot on your hook)
3. Take your tag line and run it through the eye of your hook again. The goal is to get the hook to stick out at a 90 degree angle from the main line so that the shank of the hook is parallel to the bottom
4. Then tie your weight to the tag end of your line
5. Add your lure or plastic worm to your hook
Some avid anglers have developed advanced or personal bass rigs to fool this famous game fish.
Learn more about other types of fishing knots and rigs in our next section.
Fishing Rigs

Fishing rigs are the combination of hooks, sinkers, snaps and swivels that you add to the end of your fishing line. You can also add a bobber or cork, or in some cases, a second hook. Learn here the different types of fishing rigs.
Each type of rig has a different purpose, and some rigs may have several names. Some rigs work well for particular species and are referred to as trout rigs, flounder rigs or catfish rigs. Others can be used for many species. To get started, you’ll need your rod and reel, extra line, a variety of hooks, sinkers, and swivels. If you’re not familiar with your options in this department, check out our terminal tackle page for more details.
Tip: To create the fishing rigs below, you will need to attach your terminal tackle using fishing knots. A standard fishing knot like the Improved Clinch Knot or the Uni Knot will work.
STANDARD FISHING RIGS
But just because you can tie a lot of different things to a line, doesn't mean that making a fishing rig has to be complicated. Most fishing rigs are designed fairly simply and are used for specific fishing techniques.
BASIC BOBBER RIG
For still fishing, beginner anglers should try the basic bobber rig. These are very simple fishing rigs, and the bobber will show you when a fish is biting your bait. This rig can be used when fishing for panfish, crappie, perch or any other small fish.
How to make a basic bobber rig: Steps
1. Tie a hook on the end of your fishing line with one of your fishing knots.
2. Pinch one or two small split shot sinkers to your main line about 6-12 inches from the hook to add a bit of weight to your line (this will keep your bait suspended vertically). If there is current, you can add one or two more split shots.
3. Finally, clip a circle bobber to the rig at least 3-4 feet above the hook. Where you place the bobber can vary depending on the depth of the water, but remember not to make it too long or it will be difficult to cast.
SLIDING SINKER RIG (ALSO KNOWN AS THE CAROLINA RIG OR FISHFINDER RIG)
For bottom fishing, anglers should try the sliding sinker bottom rig. It is a popular, versatile rig and is an effective way to fish bait off the bottom, both from shore and while drifting in a boat. Sliding Sinker or Carolina rigs can be used as catfish rigs, flounder rigs, trout rigs or for fishing for redfish or striped bass.
The presentation of the rig allows the sinker to rest on the bottom of the river or in the surf with the bait suspended above. This feature prevents the fish from feeling the weight as the line passes through the sinker and keeps it from getting hung up on rocks or weeds.
How to make a sliding sinker rig: Steps
1. Start by threading the main line through the hole in an egg sinker
2. Tie a swivel to the end of your main line using one of your fishing knots, so it stops the sinker from falling off
3. Attach a 6- to 12-inch piece of leader to the swivel
4. On the end of the leader, add your hook or artificial bait like a soft plastic or a jig
3-WAY FISHING RIG
Another rig that works for bottom fishing is the 3-way rig (it can also be used when fishing from shore in current). These rigs are typically considered catfish rigs and is frequently used in surf fishing as well. They are designed to keep your bait off the bottom by using a 3-way swivel. The idea is that when the three-way fishing rig is dropped, drifted or trolled, the lure or bait on the longer piece of leader hovers just over the bottom.
How to make a 3-way rig: Steps
1. Start with tying a three-way swivel to your main line.
2. Then tie a short piece of leader (or cut fishing line) to one of the swivel eyes using one of your fishing knots.
3. Then tie a longer piece of fishing line to the other eye.
4. To the shorter piece of leader, add a sinker (pyramid sinkers work best but other shapes work too).
5. To the longer piece of leader, tie your hook or lure.
TWO-HOOK BOTTOM RIGS (ALSO CALLED SPREADER RIGS)

A two-hook bottom rig is probably the most versatile of all fishing rigs. Two-hook bottom rigs can be used as flounder rigs or really to catch everything from panfish to giant grouper. This particular rig is commonly pre-made and sold at tackle shops, but you can tie your own. If you choose to purchase, you will notice that the rigs made with spreader bars instead of fishing line, this can help prevent your hooks from getting tangled.
How to make a two-hook bottom rig for smaller fish:
1. Start with an arm's length of 30- to 50-pound monofilament fishing line as a leader.
2. Tie four 2- to 3-inch dropper loop knots 3 to 4 inches apart.
3. Attach a sinker to the bottom loop using one of your fishing knots.
4. Tie a hook to each of the two middle loops.
5. Lastly, tie your main line (or the line running from your fishing reel) to the top loop.
How to make a two-hook bottom rig for larger fish:
1. Use 50- to 100-pound fishing line (any type) for leader, a snap swivel, two three-way swivels and a regular swivel.
2. Add the snap swivel to your main line.
3. Tie a 6- to 8-inch piece of leader to the snap swivel using one of the fishing knots.
4. Tie a three-way swivel to the end of the above mentioned leader.
5. Attach an 8- to 10-inch piece of leader to another eye on the three-way swivel mentioned above.
6. Tie the second three-way swivel to the end of the 8- to 10-inch leader.
7. Attach another 6- to 8-inch piece of leader to the second eye of the second three-way.
8. From each of the remaining eyes on the three-way swivels, tie a short piece of leader snelled to a hook (see snelled knots for instructions).
9. Make sure the leaders are short enough that the hooks don't become tangled. You can also add bucktail hair, beads, spinners or floats to the hooks to attract fish.
Tip: When using two-hook bottom rigs as flounder rigs, consider adding a spinner blade or beads for flash to help attract the fish.
POPPING CORK FISHING RIGS
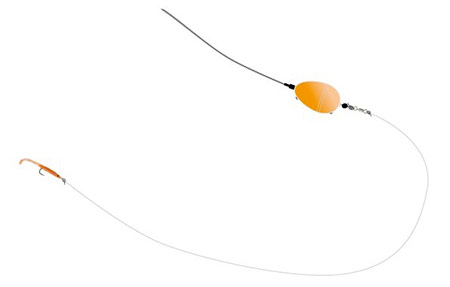
A popping cork is a fishing rig that preys on a fish's keen sense of sound and features a piece of terminal tackle called a popping cork. A popping cork can be purchased at most tackle retailers and is made up of a short piece of stiff wire threaded through a foam or cork float and a couple of metal or plastic beads. These are some of the best fishing rigs for redfish or they can be used as trout rigs for speckled trout.
How to create a popping cork rig: Steps
1. Tie one end of the popping cork to your main fishing line using a loop knot.
2. At the other end of the wire extending from the popping cork, tie a piece of leader 3-4 feet long or long enough to dangle a jig or natural saltwater bait just over the bottom.
3. A quick snap of the rod tip makes the float pop against the beads and causes the bait to hop below. Let the float settle before popping it again. This rig works best where shrimp or baitfish are active on the surface.
SPECIALTY FISHING RIGS

Sabiki rigs are designed to catch baitfish, and are rigged with tiny hooks. The hooks are typically jigs tipped with feathers. Baitfish feed on plankton, so a sabiki rig has to imitate the very small prey of a baitfish, and fit in their modest mouths.
Sabiki rigs usually come pre-made with 5-10 hooks and can be purchased at tackle shops. While you could make your own, they are relatively inexpensive, and are difficult to keep untangled when stored.
Whether you are creating catfish rigs, trout rigs, or any other rigs, make sure you secure all your terminal tackle tightly to ensure the rig does not come loose when you have a fish on the end of your line.
Once you have created your fishing rig, you are ready to begin casting. Learn more.