
Learning how to boat is easier than you might think. Just sign up to take a boating education course so that you can learn safe boat navigation skills. Part of boating responsibly, includes the understanding of how to read nautical charts along with the different types of buoys and markers.
Boat Trailering Basics
Boat trailering is great way to explore different waterways and fishing spots in your state or region. With a trailerable boat, you're free to boat and fish just about anywhere - lakes, rivers, bays or inlets. And using a boat trailer is also the most affordable way to store a boat.

THINGS TO CONSIDER BEFORE TRAILERING YOUR BOAT
Towing Capacity:Your first consideration is the towing capacity of your car, truck or SUV. You can find this information in your vehicle's owner's manual. Generally, small family sedans are not suitable for towing, although a small, aluminum fishing boat may not present a problem, provided you have appropriate towing equipment installed on the car. Most standard pickup trucks and SUVs can trailer boats up to 25 feet, but again, consult your vehicle owner's manual for limitations.
Weighing In: Your owner's manual will list the "dry weight" of your boat. That's the weight of the boat, less fuel and gear. Make sure when you're assessing your vehicle's towing capacity that you add several hundred pounds to the dry weight of the boat to account for those extras.
Muscle Power:As the weight, length and width (beam) of a given boat increase, so does the muscle power needed to launch and retrieve it. A small boat may be easy for one person to handle at the ramp, but larger boats, generally those more than 25 feet, may require additional hands. Don't be afraid to ask for help at the ramp if you need it.
BOAT LAUNCHING BASICS
Here are some tips to prepare your boat and trailer before it's your turn to launch:
①Make sure the lower unit is raised to avoid scraping.
②Install the drain plug.
③Release the securing straps.
④Disconnect the trailer's lights.
⑤Rig a line so the boat doesn't drift away after it is launched.
If you are stepping a mast, make sure there are no overhead power lines between you and the ramp. If you don't have bearing protectors, make sure hubs are cool. Next, you'll have to back the trailer onto the launch ramp.
RAMP BACKING STEPS
Ramp backing is easy and anyone can do it. Practice backing the trailer in the quiet safety of your driveway or, better yet, an empty parking lot. Ramp Backing basic steps:
①Approach with the rig close to the inside corner of the ramp.
②Turn the wheel right so the trailer swings out and around the corner.
③Turn the wheel left and back slowly as the trailer moves to the right.
④Straighten the wheel and back down the ramp.
RETRIEVING THE BOAT
When you get to the ramp, good manners are very important. If there are other boaters launching or leaving, you must wait your turn. When your turn comes, be ready to move quickly.
①Start by getting all of your gear ready to take off the boat, and get your boat ready to go on the trailer. If you have the option, let someone off the boat to get the trailer to the water while you or the other people aboard take the gear off.
②Before you back the trailer down the ramp, make sure the trailer lights aren't connected to the tow vehicle. If the trailer has a tilting trailer bed, put it in the up position. Slowly back the trailer into the water, and use the boat's bow and stern lines to line the boat up with the trailer.
③Attach the winch cable to the boat and start cranking. Be sure no one is in the direct line of the winch cable - if it breaks you can be seriously injured from the whiplash. After you have the boat all the way on the trailer, attach the safety chains and pull the boat trailer forward, making sure your boat's outboard motor or stem drive unit is raised first.
④Once you've cleared the ramp area, make sure all loose gear is stowed, attach the tie-down straps, and reconnect the trailer lights to the tow vehicle and hit the road.
⑤While many people drive the boat onto the trailer, it isn't advised. Using the engine to assist trailering erodes the ramp bed, can lead to debris being sucked into the engine and can cause an accident.
⑥Make sure you drain all water from the boat: the bilge, the livewell, the trailer lights, etc. Trailer boats are a leading cause of the spread of invasive species. Make sure your boat is cleaned thoroughly before you launch your boat again, particularly if you go to a different body of water. The best thing to do is to clean your boat at the ramp. If you can't, try to make sure that when you do wash it, the water doesn't go into a drain that feeds into a sewer that empties into a different body of water.
Boat Gas Saving Tips
Check out these easy to follow boat gas saving tips that will help you go faster and farther for less, reduce gas consumption and save money.

Steer Smart
Check local boating conditions such as currents, winds and swells before departure. A boat is less efficient in a messy chop, so do what you can to stay out of nasty water. Avoiding opposing currents, and your boat will save gas.
Take Just What You Need
Take a look at what you are carrying, and what can be left behind. Hauling around a bunch of unnecessary gear forces your boat to work harder and use more gas. You do not need to carry as much fuel and water as your boat can hold, you can just take what you need for the day. You may also consider fuel additives and treatments that will help keep gas fresh, avoid moisture, varnish and gumming problems.
Keep Your Propeller in Shape
This is another great boat gas saving tip. Keep your boat propeller always in top shape, because nicked or dinged blades not only diminish fuel efficiency, but they can also cause vibration and engine wear. Make sure you are running a propeller that allows your boat maximum efficiency.
Change the Oil, Plugs and Air Filters
Regularly change the oil and spark plugs in your boat. Gasoline powered engines require mindful tuning. Replacing or cleaning air filter elements help engines breathe easier and operate more efficiently. Some experts claim you can improve fuel economy by as much as 10 percent by servicing an extremely clogged filter.
Maintain Optimum Speed
Another boat gas saving tip is to maintain an optimum cruising speed. Needlessly pushing water costs money, and maintaining optimum speed, slightly faster than minimum planning speed will maximize your boat’s fuel efficiency. It’s also important to distribute the weight on board. Installing trim tabs can help.
Study Your Gauges
If you install a fuel flow meter you can monitor your fuel consumption in real time, which is really helpful because this will allow you to accurately adjust the throttle and trim. Monitoring your speed, rpm and fuel consumption will help you find your boat’s most efficient planning speed.
Keep It Clean
This boat gas saving tip should be applied regularly to always keep your boat in great condition. A hull covered with marine growth wastes gas. If you keep your boat in the water for extended periods, be sure to fight plant and barnacle buildup because any extra friction simply burns fuel. A fresh coat of antifouling paint prevents growth. Better yet, keep your boat on a trailer or in dry storage.
Nautical Charts
A nautical chart allows you to compare what you are seeing with what you should be seeing on the water and can help you keep your bearings.

Nautical charts are different from maps in that they specifically depict water areas, while maps concentrate on land area, roads, landmarks, etc. Land areas and features on nautical charts are sketchy and are noted only for their interest to the boater. A nautical chart conveys more information specifically designed to assist in safely navigating the area that the chart covers.
HOW TO READ NAUTICAL CHARTS
①Study your chart thoroughly.
②Look at the position from which you will start and visually follow along the course you want to take.
③Look for visual cues especially under water including water depths, and obstructions. Bridges, power lines or any other unusual items that may be a hazard to your progress.
④Make a note of each of these on a separate piece of paper.
⑤Make note of all buoys and markers you may pass in the order they will appear. This will give you a documented picture of your route and what you should expect to see without having to try to find a small marker on the chart.
⑥Look for visual objects featured on your chart that you should be able to observe and identify to confirm your position.
⑦Always check the weather before departing.
Boat Navigation, Rules and Regulations
Since there are different types of boats, boating activities and styles of boating, it is important to know what to expect when you come upon another vessel and what your obligations are. Boat Navigation rules establish actions for boaters to take to avoid a collision.
These are few simple rules that will help you stay safe and enjoy a great day on the water:
Rule of Responsibility
It is the responsibility of every boat operator to navigate in a reasonable and prudent manner to avoid a collision, taking into account the weather, vessel traffic and the limits of other vessels. Such action should be taken in ample time to avoid a collision and at a safe distance from other vessels.
Maintain a Safe Speed
Safe speed is the speed that ensures you will have sufficient time to avoid a collision and can stop within an appropriate distance. Safe speed will vary depending on conditions such as wind, water conditions, navigational hazards, visibility, surrounding vessel traffic density and the maneuverability of your boat. Always reduce speed and navigate with extreme caution at night and when visibility is restricted.
Keep a Proper Lookout
Failing to keep a sharp lookout is the most common cause of collisions. Every operator must keep a proper lookout, using both sight and hearing, at all times. Watch and listen for other vessels, radio communications, navigational hazards and others involved in water activities.
STEERING AND SAILING RULES
There are boat navigation rules that every operator must follow when encountering other vessels. The give-away vessel is the one required to take early and substantial action to keep well away from other vessels by stopping, slowing down or changing course. The stand-on vessel is the vessel that must maintain its course and speed unless it becomes apparent that the give-way vessel is not taking appropriate action. If you must take action, do not turn toward the give-way vessel or cross in front of it. These are some of the different boating scenarios:
MEETING HEAD-ON: POWER VS POWER
In this case neither vessel is the stand-on vessel. Both vessels should turn to the right (starboard) to avoid collision. Therefore, communication is needed between the two. The most common response, is to signal an intention to pass port-to-port with one short blast.
MEETING HEAD-ON: POWER VS SAIL
In this case the power-driven vessel is the give-away vessel. The sailing vessel is the stand-on vessel. The power-driven vessel must take early and substantial action to keep clear of the sailing vessel.
OVERTAKING: POWER VS POWER
The vessel that is overtaking another vessel is the give-away vessel. The vessel being overtaken in the stand-on vessel. As a give-away vessel, you must take early and substantial action to keep clear of a stand-on vessel. Sounds signals are also required.
OVERTAKING: POWER VS SAIL
The vessel that is overtaking another vessel is the give-way vessel, regardless of whether it is a sailing or a power-driven vessel. The vessel being overtaken is always the stand-on vessel.
CROSSING PATHS: POWER VS POWER
The vessel on the operator port is the give-away vessel. The vessel on the operator starboard is the stand-on vessel. As the give-way vessel, you must take early and substantial action to keep clear and avoid crossing the stand-on vessel.
CROSSING PATHS: POWER VS SAIL
The power-driven vessel is the give-away vessel. The sailing vessel is the stand-on vessel. The power-driven vessel must take early and substantial action to keep clear of the sailing vessel.
Boat Anchoring Basics
Anchoring is done for two principal reasons: first, to stop for fishing, swimming, lunch, or an overnight stay and secondly, to keep you from running aground in bad weather or as a result of engine failure.
Anchoring can be a simple task if you follow these simple guidelines:
①Make sure you have the proper type of anchor, such as danforth, plow or mushroom.
②A 3- to 6-foot length of galvanized chain should be attached to the anchor. The chain will stand up to the abrasion of sand, rock or mud on the bottom better than a fiber line.
③A suitable length of nylon anchor line should be attached to the end of the chain (this combination is called the "rode"). The nylon will stretch under heavy strain, cushioning the impact of the waves or wind on the boat and the anchor.
④Select an area that offers maximum shelter from wind, current and boat traffic.
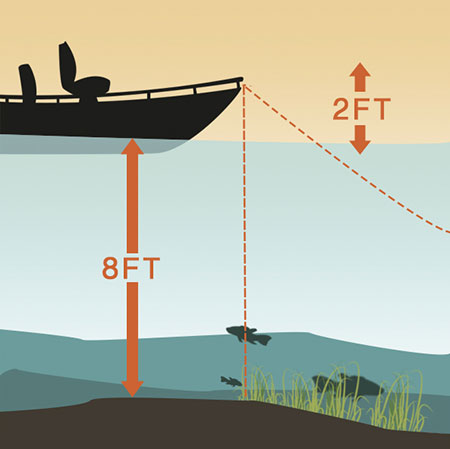
⑤Determine depth of water and type of bottom (preferably sand or mud).
⑥Calculate the amount of anchor line you will need. General rule: 5 to 7 times as much anchor line as the depth of water plus the distance from the water to where the anchor will attach to the bow. For example, if the water depth is 8 feet and it is 2 feet from the top of the water to your bow cleat, you would multiply 10 feet by 5 to 7 to get the amount of anchor line to put out (see diagram above).
⑦Secure the anchor line to the bow cleat at the point you want it to stop.
⑧Bring the bow of the vessel into the wind or current.
⑨When you get to the spot you want to anchor, place the engine in neutral.
⑩When the boat comes to a stop, slowly lower the anchor. Do not throw the anchor over, as it will tend to entangle the anchor.
⑪When all the anchor line has been let out, back down on the anchor with the engine in idle reverse to help set the anchor.
⑫When the anchor is firmly set, use reference points (landmarks) in relation to the boat to make sure you are not drifting. Check these points frequently.
TYPES OF ANCHORS
There are several types of anchors, and you should choose a style based on the bottom characteristics in the areas you will anchor most often. It’s important to choose an anchor that fits your boat and the boating conditions. These are the most common types of anchors:
PLOW-STYLE

The plow-style anchor has good holding power and is good for most boats. This kind of anchor gets its holding power by plowing into bottom sediment. Great for sand and rocky bottoms, weeds and grass.
FLUKE-STYLE (DANFORTH)

Similar to plow-style, but is more lightweight. This kind of anchor is good for most boats, and it gets its holding power from pointed flukes digging into bottom sediment. Best in hard sand or mud, where flukes can easily dig into the bottom.
MUSHROOM-STYLE

The mushroom-style anchor gets its holding power by sinking into bottom sediment. This kind of anchor should not be used for boats larger than a small canoe, rowboat or inflatable boat, since it holding power is weak.
Boat Handling Basics
All boats are handled differently but with hands-on practice you can become a proficient in handling your boat. Learn more about steering, speed, gear shifting and how different hull types can affect how your boat handles. Familiarize yourself with factors you can control, and you’ll be well on your way to a more enjoyable boating adventure.

Steering:On a small boat with an outboard motor, the motor's handle is used to steer the boat. Since the engine is mounted on the rear of the boat, it pushes the stern around, making the bow go in the opposite direction. To turn to starboard (right), move the handle to the left. To turn to port (left), move the handle to the right. You maneuver larger boats with a steering wheel, much like driving a car.
Speed:The speed of a boat depends on both the size of the motor and the boat. The speed of the motor is controlled by a throttle in much the same way a gas pedal works on a car.
Gearshift:The smallest outboard motors have no gearshift. The boat moves as soon as the engine is started. Larger motors have a gearshift lever. There are three positions—forward, neutral and reverse. Place the lever into neutral to start the engine, then, when it's running, put the lever in forward or reverse gear to move forward or backward.
Placing the shift lever in neutral will not stop the boat. Since a boat does not have brakes, you must learn to judge your speed and maneuver carefully, using the forward and reverse controls to avoid hitting docks and other boats or objects.
HOW PLANING HULLS OPERATE
Boats with planing hulls are designated to rise up and glide on top of the water when enough power is supplied.
Displacement Mode:A planing hull, when operated at very slow speeds, will cut through the water like a displacement hull.
Plowing Mode:As speed increases, a planing hull will have a raised bow, reducing the operator's vision and throwing a very large wake. Avoid maintaining a speed that puts your boat in plowing mode
Planing Mode:Your boat is in planing mode when enough power is applied so that the hull glides on top of the water. Different boats reach planing mode at different speeds.
BOAT DOCKING BASICS
Boat handling also involves making sure your boat is docked safely. Here are some basic tips:
①Decrease your speed when approaching the dock, secure fenders on the docking side, and ready the docking lines.
②If you are headed to a marina with limited docking stations, be patient and courteous. Communicate your intention to other vessels that are departing.
③Take water current into account when docking as it can have much of the same affects as wind.
④Take wind into account when docking. If the wind is in your face approach the dock at a steep angle of 30 to 45 degrees and swing the boat quickly.
⑤If the wind is at your back approach the dock at a shallow angle of about 10 to 20 degrees, stop the boat, and allow the wind to drift the boat into the dock.
Boating Responsibly
Boating responsibly depends on you, your equipment and other people who, like yourself, enjoy spending leisure time on, in or near the water. You are responsible for the safety of everyone aboard your vessel at all times.

BOATING RESPONSIBLY TIPS
①Make sure your boat is in top operating condition and that there are no tripping hazards. Your boat should be free of fire hazards and have clean bilges.
②Carry safety equipment required by law on board, maintained in good condition, and know how to properly use these devices including signaling and sound-making devices.
③File a float plan with a relative or friend. In case of an emergency, they'll have pertinent information, allowing them to contact the local marine police or Coast Guard with necessary details.
④Have a complete knowledge of the operation and handling characteristics of your boat.
⑤Know your position and where you are going. Learn how your GPS works and carry a nautical chart in case you can’t use your GPS system.
⑥Maintain a safe speed at all times to avoid collision. You must always operate your vessel at a safe controlled speed.
⑦Keep an eye out for changing weather conditions and act accordingly. Tune in your radio to receive weather updates.
⑧Know and practice the navigation rules. Know and obey federal and state regulations and waterway markers.
⑨Maintain a clear, unobstructed view forward at all times. “scan” the water and avoid “tunnel” vision. Most boating collisions are caused by inattention.
Buoys and Markers
Buoys and markers are the "traffic signals" that guide vessel operators safely along some waterways. They also identify dangerous or controlled areas and give directions and information. Learn about the different types and colors of buoys and markers in this section.
LATERAL MARKERS
These navigation aids mark the edges of safe water areas: for example, directing traffic within a channel. The markers use a combination of colors and numbers, which may appear on either buoys or permanently placed markers.

COLORS AND NUMBERS
The colors and numbers have the same meaning regardless of the kind of buoy or marker on which they appear.
RED COLORS, RED LIGHTS AND EVEN NUMBERS
These mark the edge of the channel on your starboard (right) side as you enter from open sea or head upstream. Numbers usually increase consecutively as you return from open sea or head upstream.

GREEN COLORS, GREEN LIGHTS AND ODD NUMBERS
These mark the edge of the channel on your port (left) side as you enter from open sea or head upstream. Numbers usually increase consecutively as you return from open sea or head upstream.
RED AND GREEN COLORS AND/OR LIGHTS
These are placed at the junction of two channels to indicate the preferred (primary) channel when a channel splits. If green is on top, the preferred channel is to the right. If red is on top, the preferred channel is to the left. These can also be referred to as "junction buoys".
SHAPES
NUN BUOY
These cone-shaped buoys are always marked with red markings and even numbers. They mark the edge of the channel on your starboard (right) side when entering from open sea or heading upstream.
CAN BUOY
These cylindrical-shaped buoys are always marked with green markings and odd numbers. They mark the edge of the channel on your port (left) side when entering from open sea or heading upstream.

OTHER KINDS OF BUOYS AND MARKERS
LIGHTED BUOYS
These buoys use lateral marker shapes, colors and numbers, and have a matching colored light.
DAYMARKS
These are permanent signs attached to structures, such as posts, in the water. Common daymarks are red triangles (equivalent to nuns) and green squares (equivalent to cans). They also may be lighted.
RED RIGHT RETURNING
In most circumstances, you can use this phrase as a reminder of the correct course when returning from open waters or heading upstream.

VARIATIONS ON THE U.S. AIDS TO NAVIGATION SYSTEM
The Intercostal Waterway (ICW) is a chain of local channels linked together to provide an inland passage along the Atlantic and Gulf of Mexico coasts. Channels that are part of the ICW are identified by yellow symbols on channel buoys and markers. When following the ICW from New Jersey heading toward Brownsville, Texas, these rules apply:
①Any marker displaying a yellow triangle should be passed by keeping it on the starboard (right) side of the vessel.
②Any marker displaying a yellow square should be passed by keeping it on the port (left) side of the vessel.
③These rules hold regardless of the shape or color of the channel marker or buoy on which the ICW symbols are displayed. When following the ICW, the yellow markings should be used as guides, rather than the colors and shapes of the lateral navigation markers on which they appear. Intercoastal Waterway symbols are most commonly found on daymarks.
WESTERN RIVERS SYSTEM
This system of markers is used on the Mississippi River and its tributaries above Baton Rouge, Louisiana, and on some other rivers that flow toward the Gulf of Mexico. Navigation markers on the Western Rivers System are not numbered. Numbers displayed below daymarks along this system are not associated with the right or left side of the channel; these numbers indicate distance from the river's mouth (except the Ohio River, indicating distance for the headwaters).

NON-LATERAL MARKERS
These give information other than the edges of safe water areas. They are found on lakes and rivers and are used to:
①Give directions and information
②Warn of hazards and obstructions
③Mark controlled areas
④Mark exclusion (closed) areas

SAFE WATER MARKERS
These are white with red vertical stripes and indicate unobstructed water on all sides. They mark mid-channels and fairway, and may be passed on either side.

INLAND WATERS OBSTRUCTION MARKERS
These are white with black vertical stripes and indicate an obstruction to navigation. You should not pass between these buoys and the nearest shore.

MOORING BUOYS
These are white with a blue horizontal band, usually placed in marinas and other areas where vessels are allowed to anchor. These are the only buoys you may tie up to legally.
Boat Hauling Basics
Boat hauling is easy and anyone can do it. Whether you’re a beginner or have hundreds of miles under your belt, we’ve put together information to help you trailer your boat in a proper and safe manner.

BOAT HAULING CHECKLIST
Use this helpful checklist to transport your boat safety from home to the launch and back again. Never tow your boat trailer before you check to be sure:
①Coupler, hitch and hitch ball are the same size
②Coupler and safety chains are safely secured to hitch of tow vehicle
③All fasteners are properly tightened
④Boat is securely tied down to trailer (winch line is not a tie down)
⑤Wheel lug nuts are properly tightened
⑥Wheel bearings are properly adjusted and maintained
⑦Load is within maximum load-carrying capacity
⑧Tires are properly inflated
⑨All trailer lighting is working properly
⑩Trailer brakes are properly adjusted and working (if trailer is so equipped)
⑪Be sure to check local and state requirements regarding brakes and any additional equipment that may be required
CHECK YOUR STATE BOATING REGULATIONS
Trailering laws vary somewhat from state to state and are often based on weight and beam. Before you head out on the open road, make sure your boat trailer adheres to all the state regulations. At a minimum, all trailers need to have working taillights and brake lights, and most states require registration of the trailer with the Department of Motor Vehicles.
Boat Storage
Properly maintaining your boat takes more than just waxing it smooth and keeping it free of lingering sea creatures. You’re going to have to spend some time checking all of the boat’s moving parts if you want it to be ready for the next fishing season.

THINGS TO CONSIDER BEFORE STORING YOUR BOAT
Before you do any transporting, take a minute to make sure that your vessel’s insurance card, title and license are all up to date. Boat storage does have a few requirements:
①You will be asked to show registration and/or title.
②Depending on the state, boat storage tax will vary.
PREPARE YOUR BOAT
Look for anything that might need repairs, replacements or modifications. Make sure that all the electronics are working properly and the holding tank is free of any leaks. Also, look for holes or tears in the sails and clean off any tarnish on your metal or varnished woodwork. Here’s a handy list of items and equipment for you to check:
Fire extinguisher
Life Jackets also known as PFD personal flotation devices
Navigation lights
Horns
Flares
Day signals
Ventilation grates
Dock lines
Anchors
Vessel’s papers, radio license, etc.
CLEAN YOUR BOAT
After you have run through the checklist of repairs and replacements, clean the inside of your boat.
①Remove any and all traces of garbage.
②Clear our any lockers or cabinets in the cabin.
③Scrub the decks with some lemon oil.
④Clean your boat’s carpets and dust its curtains.
⑤Empty out your bilge, but don’t pump the bilge water out if you see an oily film, you don’t want to pollute the water.
CHECK THE ENGINE
After you’re done all the things above, head over to the engine bay.
①Top off the fuel tank with gas and add fuel stabilizer to keep your gas fresh.
②Change the oil filter and replace the engine oil.
③Check all the hoses, belts and clamps to make sure there aren’t any holes, leaks or frays.
④Flush out the coolant system with water. If you live in extremely cold weather, take an extra step of precaution and add some antifreeze.
OTHER TIPS FOR STORING YOUR BOAT
①If you really want to be thorough in your inspection, flush out the head with clean water.
②Pump out whatever remains in your holding tank. ③You’ll want to take a quick look at the Y-valve, macerator and discharge hose to see if anything needs fixing.
④Store your boat stern-down so that rain (or melting snow in colder weather) drains through the scuppers.
⑤Give your vessel some structural support under boat covers and tarps.